Free requests
⚠️ Prerequisite: training requests must be enabled on your platform. To learn more, see Training requests.
Open training requests
⚠️ Prerequisite: training requests must be enabled on your platform. To learn more, see Training requests.
⚠️ Required permissions: the Create and edit training requests permission.
An open training request lets a learner request training that is not currently available on the platform, for example a course provided by an external training organization.
The learner completes a form that you have configured, and the request then follows the approval workflow defined for your account.
If you want to suggest training opportunities to learners instead, see Training interests.
Create an open request form
- Go to Configuration > Content > Training requests.
- In the Open request section, click Create a new form.
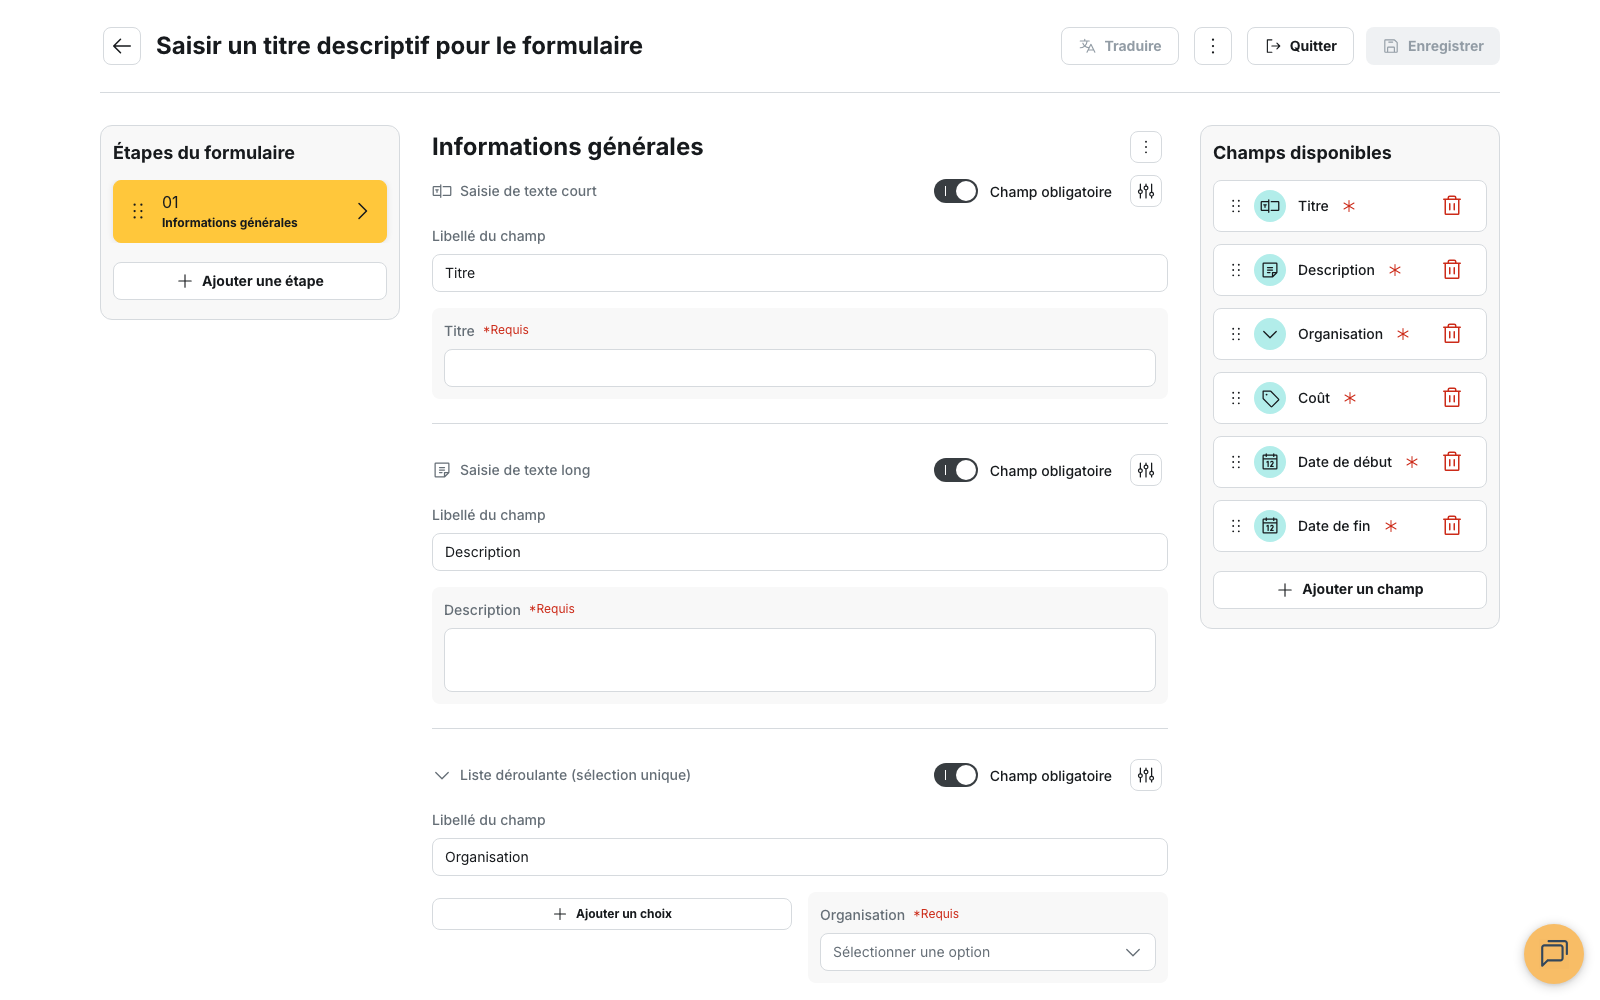
- Configure the General information step. It contains six required fields:
- Title;
- Description;
- Organization;
- Cost;
- Start date;
- End date.
- Add any additional fields you need, such as a Long text field or File upload.
The information entered under General information is used in the back-office list and in emails sent to the people responsible for approving the request.
The form editor is divided into three areas:
- Form steps on the left;
- the fields for the selected step in the center;
- Available fields on the right.
A red asterisk indicates a required field.
You can create several forms, for example to separate different types of requests or training needs.
Understand form versions
Each request keeps the version of the form that was used when it was submitted.
Each form displays its Version number and Last updated date. If you add a new field later, it is not added retroactively to requests that have already been submitted.
Choose who approves requests
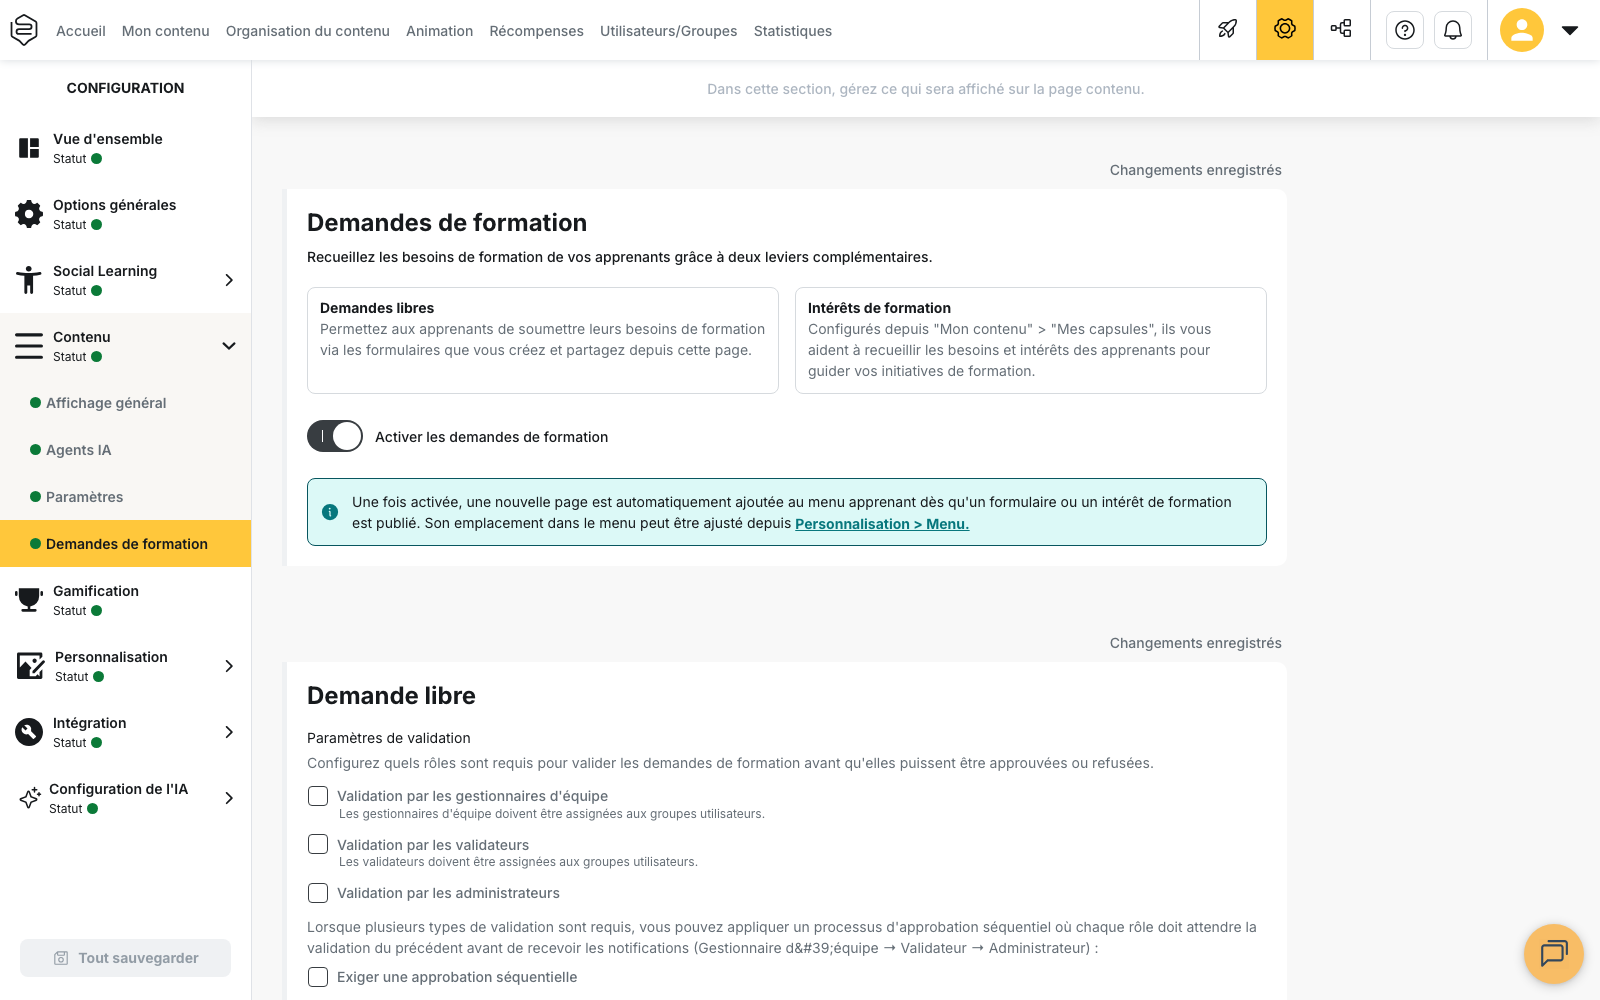
The roles responsible for approving requests are configured under Approval settings on the same screen.
These settings apply to all open request forms.
The people involved depend on the roles assigned within the groups the learner belongs to. To understand how these roles are configured, see Assign roles within a group.
The Enable training requests toggle and the approval settings are available on the same screen, above the Open request section.
Each role takes part in the approval process differently:
- the team manager receives an in-app notification under Pending requests > Training > Open requests, as well as a push notification and an email;
- the approver receives an email from which they can approve or reject the request directly;
- the administrator receives a back-office notification and an email.
Approval progress is tracked by role, not by the number of people contacted. Each role provides one response, and its most recent response replaces the previous one.
For example, the 2 out of 3 indicator means that two of the three required roles have approved the request.
⚠️ A single rejection is enough to reject the request. As soon as one required role rejects it, the request is rejected without waiting for responses from the remaining roles.
Use sequential approval
When Require sequential approval is enabled, the roles are contacted one after another:
- the team manager;
- the approver;
- the administrator.
Each role is contacted only after the previous one has approved the request.
Without this option, all required roles are notified as soon as the request is submitted.
⚠️ If no role is selected, the request is approved automatically when it is submitted. Select at least one role if you want requests to go through an approval process.
Track a request as a learner
From the Training requests page, the learner opens the Open requests tab and clicks Create a training request.
They then select a form under New training request, complete it and submit it.
The request moves to the Pending approval status.
Learners can then find all their requests under Training request history, along with the information they submitted and one of the following statuses:
- Pending;
- Approved;
- Rejected;
- Cancelled.
The Cancel request action is available only while the request is still pending.
A cancelled request cannot be reopened, but the learner can submit a new one immediately.
Process a request
Go to Engagement > Training requests, then open the Open requests sub-tab.
Requests are grouped by status:
- Pending;
- Approved;
- Rejected;
- Cancelled, displayed only if at least one request has been cancelled.
The table includes:
- Status;
- Author;
- Email address;
- Form name;
- Approvers;
- a date based on the request status: Creation date, Approval date, Rejection date or Cancellation date.
Click a request to view the completed form, then use Approve or Reject depending on your role in the approval workflow.
⚠️ The list is limited to a selected period. By default, only requests from the Last 90 days are displayed. If you are looking for an older request, select a longer period.
Export requests
The Export button generates an Excel file based on the requests currently displayed.
The export takes the active filters and search into account. It contains:
- one sheet per form;
- one column per form field.
The button remains inactive if no request matches the selected criteria.
Override a decision
The Force approval and Force rejection actions, available from a request’s menu, let you set its status directly without following the standard approval workflow.
- Force approval is available for Pending and Rejected requests;
- Force rejection is available for Pending and Approved requests;
- a Cancelled request can no longer be changed.
The learner is notified of the decision in the same way as for a standard approval or rejection.
⚠️ The details of the approval workflow leading to an overridden decision are not retained. If you need to keep a record of who made the decision or why, store that information outside the platform.
Good to know
Approving a request does not create an enrollment in Beedeez. No learning path, capsule or session is created or assigned automatically. Any further enrollment steps must be handled separately, especially when the training is provided by an external organization.
No budget is tracked automatically. The Cost field is simply a value entered in the request. It appears in emails and exports, but the platform does not calculate totals, limits or remaining budgets.
No automatic reminders are sent. An unprocessed request can remain Pending indefinitely.
The “Who can see this form?” setting does not currently restrict form visibility. The setting is saved, but every active form remains available to all learners.
Approval settings are saved when the request is submitted. Changing the approval workflow does not affect requests that are already in progress.
Learn more
- Training requests: understand how to enable the feature and configure the approval settings shared by all requests.
- Training interests: suggest training opportunities directly to learners instead of waiting for them to submit a request.
- Assign roles within a group: define the team managers and approvers involved in processing requests.